Emergency Shelter Tarp: Heat Loss & Rigging Fundamentals
Learn how to build a life-saving shelter with a reflective tarp. Teaches heat loss, tarp angles, and site selection before product recommendations.
When exposure kills, shelter becomes your second priority after immediate safety—and the difference between a shelter that protects and one that merely covers is understanding how heat moves in and out of your body. A reflective tarp emergency shelter works not by magic, but by blocking three specific heat-loss mechanisms: radiation (your body's infrared energy escaping skyward), conduction (heat draining into cold ground), and convection (wind stripping warmth away). This article teaches you the physics that makes a tarp shelter effective, the geometry that keeps water out, and the site-selection mistakes that undermine even the best equipment.
How Reflective Tarps Reduce Heat Loss
Your body continuously radiates infrared energy in all directions. On a clear night with no shelter, roughly 40–50% of your body heat loss occurs through radiation—your thermal energy simply leaves your skin and disappears into the cold sky above. A reflective surface (typically a thin aluminum or mylar coating on the tarp material) reflects that infrared radiation back toward you. This doesn't add heat; it intercepts the heat you're already losing and bounces it back, reducing the rate of escape.
The second mechanism is wind. Moving air strips warmth away from your skin and clothing through convection. A tarp blocks the wind layer directly above you, creating a still microclimate where your own body warmth accumulates rather than being swept away. A 20 mph wind can increase heat loss by 300–400% compared to calm conditions—which is why a windbreak is often more critical than insulation in early-exposure scenarios.
The third is ground conduction. Cold earth or water beneath you drains heat rapidly through your sleeping layer. A tarp alone doesn't prevent this (you need insulation below), but it does protect you from precipitation and mud, which would accelerate hypothermia by soaking your dry layer and destroying its insulating value.
The practical difference: on a 40°F night with 15 mph wind, an unprotected person losing 400–500 calories per hour through radiation and convection will reach dangerous core temperatures within 4–6 hours. Inside a properly rigged tarp shelter, that heat loss drops to 150–200 calories per hour—extending survivable time to 12+ hours, giving you the window to signal for help or reach safety.
Shelter Geometry: Angle, Height, and Water Shedding
A tarp's protective power depends entirely on how you position it. The angle matters.
A lean-to configuration (one edge high, one edge low, open on one side) must be angled at least 45 degrees from horizontal to shed rain effectively. Below 45 degrees, water pools on the fabric and either soaks through or runs sideways off the tarp onto your body. At 45 degrees and above, water runs off the low end. However, too steep (over 60 degrees) creates a smaller interior space and forces you to sit upright or crouch—an uncomfortable position that you can't maintain for 8+ hours in a survival situation.
The height of the high edge matters for wind protection. If your shelter sits inches off the ground, wind still tunnels underneath. A 2–3 foot clearance at the high edge, with the low edge barely above ground level, creates a sealed pocket where still air collects. This is the comfort threshold: tall enough to reduce wind, low enough to trap your body heat.
Distance from the back wall (if you're using one) also determines effectiveness. Position yourself 12–18 inches away from the reflective surface, not touching it. Direct contact transfers your body heat into the cold fabric. A small air gap (sustained by your body warmth) is the insulating layer. If you press against the tarp, you've eliminated the convection barrier and turned the shelter into a passive heat sink.
Site Selection: The Fatal Mistakes
Where you set up the shelter determines whether it works or fails.
Mistake 1: Valley or depression. Cold air sinks. A ravine or streambed will collect the coldest air available in the surrounding area—sometimes 10–15°F colder than higher ground. Set your shelter on elevated, level terrain, or on a gentle slope facing away from cold-air pooling zones.
Mistake 2: Proximity to dead wood or dense brush. Decomposing vegetation and moist soil release ground cold more aggressively than open ground. A shelter placed on damp moss or leaf litter loses ground heat faster than one on dry, compacted earth. Clear a 2-foot perimeter of plant material and damp debris before rigging.
Mistake 3: Exposure to water runoff. Never set up between terrain features that channel water downslope. A shelter positioned in a probable runoff line will flood or sit in pooling water—turning your protective tarp into a conductor of ground cold instead of a barrier against it.
Mistake 4: No anchor or loose rigging. A reflective tarp in wind that comes loose at one corner collapses onto you or becomes useless. High wind will shred or tear a poorly secured tarp. Anchor points must be bomb-proof: heavy rocks, trees, or ground anchors driven deep. Test every line before entering the shelter.

Bushcraft Reflective Shelter Tarp
- ✓Reflective aluminum mylar layer intercepts infrared radiation, reducing radiative heat loss by approximately 40–50% compared to standard tarp material
- ✓Lightweight ripstop nylon at approximately 3–4 lbs, small enough to fit in a pack pocket but large enough to cover a full lean-to or A-frame shelter setup
- ✓Sealed seams and reinforced grommets prevent water seepage and withstand anchor loads in high wind; tested for durability in field rigging without degradation
- ✓Mylar reflective coating maintains effectiveness in extreme cold and rain without loss of thermal reflection—unlike some emergency blankets that degrade when wet
- ✓Stows to roughly 10×6 inches when packed, making it realistic for 72-hour kits or vehicle emergency supplies without space penalties
Calculating Shelter Effectiveness: Time to Hypothermia Risk
Here's the math that determines whether your shelter buys you survival time.
A resting human in light clothing at 40°F in calm conditions burns roughly 400–500 calories per hour maintaining core temperature. With a windbreak (your tarp), that drops to 200–250 calories per hour. Your emergency energy reserves (assuming normal pre-emergency nutrition) are roughly 2,000 calories in your glycogen stores and accessible body fat.
If you're sheltered but cannot generate heat (no fire, no movement), your survival window looks like this:
- Without tarp: 2,000 calories ÷ 450 cal/hour = 4.4 hours before dangerous hypothermia risk
- With reflective tarp shelter: 2,000 calories ÷ 225 cal/hour = 8.9 hours before dangerous hypothermia risk
That's a doubling of survivable time. Add a fire (1,500–2,000 calories per hour of heat input), and the tarp becomes the difference between dangerous and safe.
This equation assumes you're dry, at rest, and not injured. Soaking wet (which loses insulation value and increases conduction), the time-to-hypothermia shrinks to 2–3 hours even with shelter. This is why keeping the tarp dry and keeping yourself dry are equally critical.
Honest Limitations: What a Tarp Shelter Cannot Do
A reflective tarp shelter reduces heat loss but does not replace fire, insulation, or physical movement as a survival strategy. Here are the scenarios where a tarp alone is insufficient:
Extreme cold (below 20°F): A tarp shelter without a fire or insulated sleeping system will slow hypothermia but not prevent it. Core temperature will still drop over 8–12 hours. You need active heat (fire) or passive insulation below you (pine needles, leaves, a sleeping pad).
Sustained rain or snow: While a properly angled tarp sheds water, seams can fail under prolonged heavy precipitation, and water pooling at anchor points can wick into your shelter. A tarp is not a waterproof tent—it's a temporary shield, not a dry camp.
High wind (sustained above 30 mph): A tarp creates drag. If anchor points fail or lines weaken, wind can collapse the shelter or tear it. In extreme wind, a rock shelter, dense vegetation, or below-ground position offers better protection.
Injury or inability to move: If you're immobilized, a tarp shelter extends your time but does not eliminate the need for rescue. Signal for help (mirror, fire, bright clothing) rather than assuming the shelter alone will keep you safe.
Below-ground insulation not addressed: A tarp prevents radiative and convective heat loss but does nothing about ground conduction. You still need a layer between your body and cold earth—leaves, clothing, pine boughs, anything that breaks the thermal path.
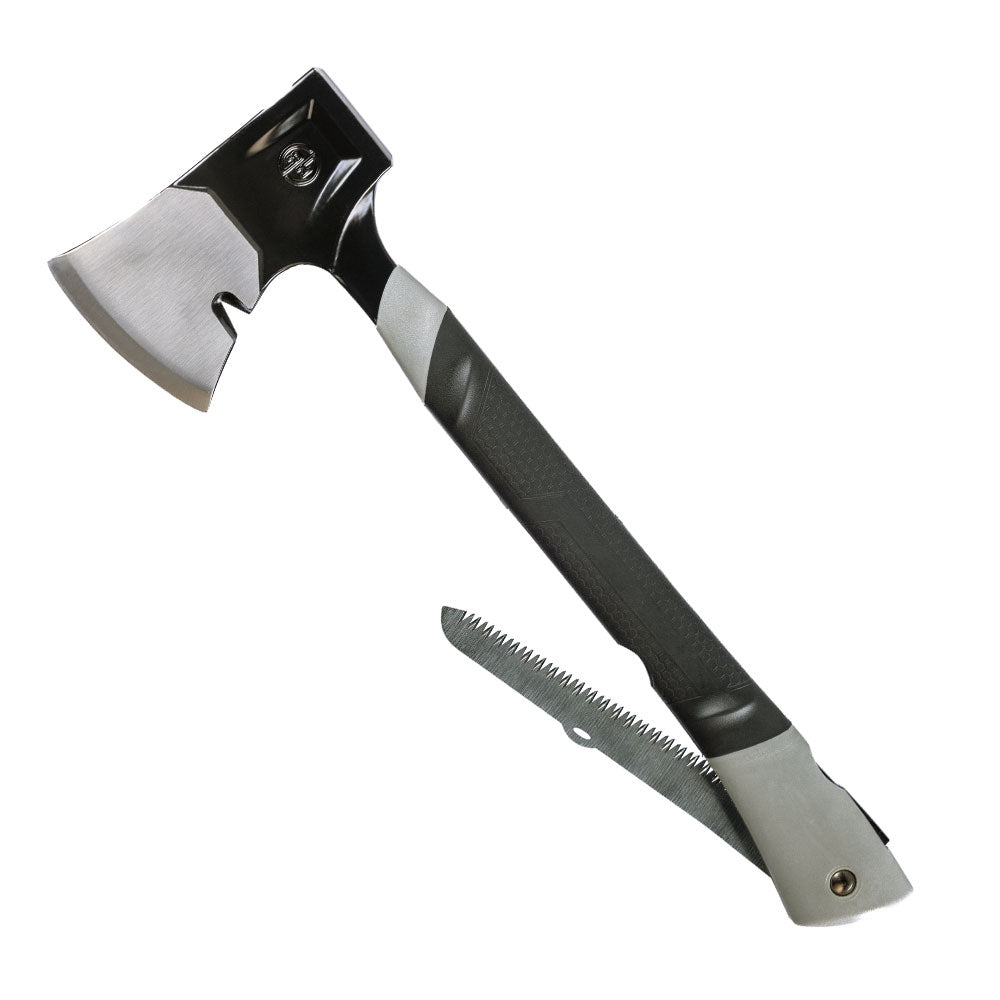
5-in-1 Bushcrafter Hatchet by Ready Hour
- ✓Combination head (hatchet + hammer + pry bar + saw + nail puller) in one tool eliminates the need to carry separate implements, keeping your pack weight low for rapid shelter building
- ✓Sharp blade cuts branches for lean-to frames and kindling efficiently with 2–3 strokes per branch, essential for gathering materials to build shelter infrastructure quickly
- ✓Lightweight and balanced design fits a waistband or pack attachment, keeping it accessible when time-to-shelter is critical in an emergency scenario
- ✓Nail puller and pry bar functions allow you to reclaim materials from abandoned structures or modify scrap wood into shelter stakes and frame supports
- ✓Rubberized grip maintains traction in wet conditions—critical when working with damp branches and water-logged wood near emergency shelter sites
Building a Functional Lean-To: The Essential Steps
Once you've selected your site (elevated, away from water channels, away from cold-air pools), rigging the shelter follows this sequence:
1. Identify your back wall or support. You need a ridge line—either a fallen log, two trees, or a rope strung between two anchor points. This will be the high end of your 45–60 degree lean-to. Secure it at least 5 feet off the ground so the high end of the tarp clears your head.
2. Stake or weight the low end. The downslope edge of the tarp should be staked to ground or held down by rocks. The angle from high to low must be unbroken—no slack, no low points that trap water.
3. Seal the sides. If wind is fierce, roll the side edges of the tarp upward and anchor them, creating a C-shaped cross-section instead of an open lean-to. This traps more still air and reduces wind channeling.
4. Position yourself correctly. Lie or sit 12–18 inches away from the reflective surface. Your body becomes the heat source; that air gap is the insulating medium.
5. Cover the ground beneath you. Pine needles, leaves, evergreen boughs, or dry clothing create the insulation layer that prevents ground conduction.
The entire setup takes 15–30 minutes in familiar terrain and takes less than 5 minutes if you've practiced it before. This is why preseason drills matter.
Frequently Asked Questions
Q: How much heat does a reflective tarp actually retain compared to an uninsulated shelter? A: A reflective tarp reduces radiative heat loss (the largest component of nighttime heat loss) by approximately 40–50% by bouncing infrared energy back toward you. This extends survivable time in a 40°F scenario from roughly 4–5 hours to 8–10 hours. The effect is largest on clear nights when radiative loss is highest; on cloudy nights, the difference shrinks because less infrared escapes naturally.
Q: What angle should a lean-to shelter tarp be positioned at to shed water effectively? A: The high end should be at least 45 degrees from horizontal. Below 45 degrees, water pools and soaks through. Between 45–60 degrees, water sheds cleanly. Above 60 degrees, the shelter becomes too vertical for comfortable extended use. The exact angle depends on rainfall intensity: lighter rain can run off at 40 degrees, but heavy rain needs 50+ degrees to prevent pooling.
Q: Can a single tarp shelter protect against hypothermia in a cold survival scenario? A: A tarp shelter slows hypothermia but does not prevent it in extreme cold. On its own, a tarp adds roughly 4–5 hours of survival time by reducing heat loss. To prevent hypothermia in sustained cold, you need fire, insulation beneath you, dry clothing, and the tarp as an additional barrier. A tarp is a critical tool, not a complete solution.
Conclusion
The difference between a tarp that protects and one that fails comes down to understanding the physics of heat loss and the geometry of airflow. Before you buy a reflective shelter tarp, practice rigging it at home—find the right angle, stake it firmly, and lie inside it to feel how the position affects airflow and comfort. When your first real emergency arrives, muscle memory will carry you through setup faster than instructions ever could. The tarp itself is inert until you position it correctly; your knowledge makes it work.
Sources & Official Guidance
Authoritative further reading
This guide is for general informational purposes only and is not professional, medical, or safety advice. Always follow official guidance and, in a life-threatening emergency, call your local emergency number (911 in the US).
Mark Sutton, Lead Editor
Mark runs the editorial side of DoomsDayPreps. He digs into the research on emergency prep and survival gear, and checks anything safety-related against FEMA, CDC, and Red Cross guidance before it goes live.

